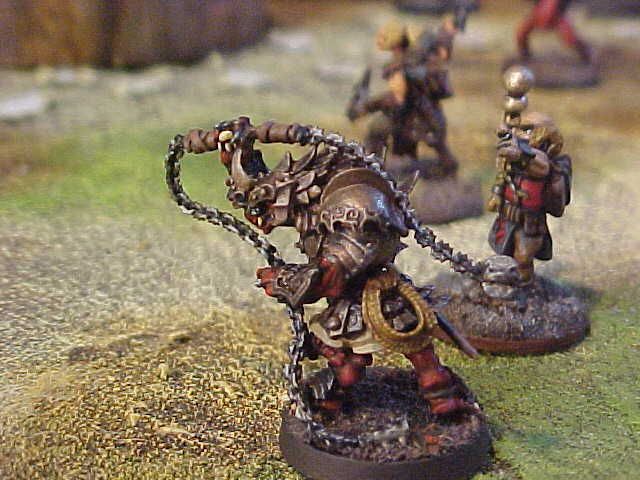
A couple of years back when D&D 4E first came out I did a conversion for a Dragonborn Chain Fighter based on a Reaper Miniatures
Reptus Longstriker and some of their chain bits. I posted this on RPG.net before I had my blog, so I thought I'd share it here as well for those folks who did not catch it there.
I'll illustrate the whole process with some pics I took as I went along.
Stage 1
Examine the base miniature. Here are all of the components of the Longstriker:

Below are the components from the Reaper chain weapon pack that I used:

Stage 2
Taking a jeweler's saw, I carefully sawed the tail off of the body of the Reptus figure (Dragonborn do not have tails). I did this in several steps, and was careful not to saw into any of the other neighboring details. I then used a sharp xacto blade to clean up the area. Since the area of the cut is largely obscured by the model's clothing and armor, and the cut was clean, no greenstuff putty was needed to clean up the area or fill any gaps.

Stage 3
I then had to cut up the separate right arm, removing the pieces of the halberd on either side of the hand. I decided to leave a large piece of the leather wrapped handle in his hand, and mount the chain to either side of it. The illustration of the spiked chain on pg. 220 of the PHB shows a pair of handles, so I figured I'd include one central handle.

Stage 4
Using a bit of greenstuff epoxy putty, I positioned the lower right arm into the socket hole of the main Reptus body. I used greenstuff for this instead of super glue because I wanted to retain some posability as I fiddled with the chain pieces in later steps. It takes a while for greenstuff to set up, so you have some time to move things around. I would later strengthen the bond with some superglue applied using a toothpick so as not to slop it onto other areas. Here's the model with the complete right arm assembly:

Stage 5
At this point I super-glued the Reptus into the slotted base. I chose a round slot because I prefer them to squares for character models. I then took two pieces of chain from Reaper's chain weapon sprue and dry-fit them into the upper section from the left hand to the bottom of the handle in the right hand, and the bottom of the left hand to the slotted base. After some pain-staking bending and re-bending, I finally found a fit and look I liked for these first two sections of chain. I then applied very small blobs of greenstuff to all three contact areas (bottom of the handle, top of left hand, bottom of left hand). This gave me enough adhesion to settle the chains into place and then fiddle with them a bit to get them right. Once I was satisfied, I again applied some superglue with a toothpick to solidify the hold.
I should add that I use Zap-A-Gap brand Gel super-glue almost exclusively. It's the best in terms of hold and control. It's the one with the green label. Here's a pick of stage 5:

Stage 6
Even though this Dragonborn would be a Chain Fighter, I wanted him to have some backup weapons. I took a sword from Reaper Weapon Pack I and cut it down a bit to make a long knife. I placed this into the gap in his armor plates over his right hip using a blob of greenstuff to get it into proper position.

Stage 7
In stage 7 I attached the lower bludgeon to the chain weapon. I decided to use one of the spiked cylindrical pieces. I cut the spikes off one side to create a side that would lie flat on the base. I put a small blob of greenstuff on the flat side and dropped it on the base near the chain. Then I used my xacto blade push it over into line. I used a bit of greenstuff on the end of the chain to make a nice meeting between the two. Once I flocked the base this would all be pretty invisible. Here's a look at this stage:

Stage 8
In step 8 I positioned a third length of chain over the model's back, connected to the upper half of the handle. before attaching it using greenstuff and a little glue, I dry-fit it, bending it to the desired position, then I attached the bladed bludgeon using, you guessed it, some greenstuff. Once I was satisfied with the way it rested over his shoulder and down his back, I added some superglue with a toothpick to key points along the model's back armor area.
Here is the pic of this stage:

Stage 9
Final details included adding a last-minute pair of throwing knives to model some ranged attack ability, and a heft of rope give him that look of an adventurer. Both of these came from the Mordheim equipment sprue. I desperately wanted to add a small pack or pouch, but there was just no room. I tried, but the figure looked too crowded, so I ripped them off.
At this point I also added some Renaissance Ink Medium Flocking Gel to the base for texture and to hide some of my messy conversion work. I like this stuff more than sand; when it dries it's like concrete and it takes paint very well.
Oh well. Any way, here is a shot of the finished, unpainted Dragonborn Chain Fighter:

Here's a shot from another angle:

And the finished, painted Dragonborn Chain Fighter!


As always, thanks for visiting!
--Scott


